Showing posts with label easy. Show all posts

Thursday, July 19, 2012

How to Make Layered Felt Flower


Hello guys, a happy Friday to you all! As I have talked about before, zakka may be small and easy to make, while the charm of it is that it can bring beauty and improvement to our life. Today I would like to share an easy made zakka with you all: layered felted flower.

I found this tutorial at creationsbykara. It is really fun and simple. The most important is: it is cute!


First of all, take a look at some of the materials needed. They are felt, sturdy thread and needle, scissors, and tiny beads. These materials can be get prepared easily!

Then here comes the instructions:
1.      Cut a tiny little round-like shape. It would be much cuter if it is not so perfect circles, do not worry to make a pattern.
2.      Take the first piece cut before as a guide to cut the second layer slightly bigger.
3.      Repeat the process till you have the size of flower you want.
4.      Stack all the pieces together and sew them with the thread and tiny beads to add some bead touch. 
Here is the step by step picture!


With these easy steps you get a cute zakka felt layered flower! You can use it as a brooch or hair clip or the like. Just make with your own creativity! Make this lovely flower for a friend this weekend :)


Thursday, June 14, 2012

DIY Hanging Air Plant Container


Have you ever grow some plants in your room? In these days, the air plants are very popular among people. They do not require soil and lots of maintenance. That’s why that they are so popular among city dwellers. There are many beautiful ways to display air plants in glass vase. But taking the plants out to be watered and then rearranging them seems a little fussy. So our smart Tempest comes up with a solution: Hang them in the bathroom, so the plants can be automatically watered by the shower steam! How clever! And this is going to be our DIY project.


First of all, there are sever material may be needed. They are specifically: clean plastic bottle lids, string, spray paint(optional), air plants, hammer and thin nail.


Then here is how to do it. Pierce a hole in the top of the plastic lid with a nail.


When this is done, you can apply some paint on the lid to achieve your desired.


Next, thread a piece of string through the hole in the lid and gently tie around the air plant. So it can be fixed into it.


The finishing step: hang it near the window of the bathroom so they can get both shower steam and sunlight.


Quick, easy, fun right? Hope you enjoy it. And thanks for sharing, Tempest!
(Please note that the pictures are from: http://www.designsponge.com/)

Monday, June 4, 2012

Monday DIY: Knit Votive Covers


Hello lovelies, it is Monday today. How was the weekend? Not bad, I Guess. lol. Well, in the previous posts, I had shared some lovely zakka related stuffs with you. And as I have said, I will keep sharing the zakka stuffs with you all. Because I am the person who lives positively and want discover some little beauties in life. And the zakka has it! Hope you can like my post.


As the start of a new week, today I would like the share you all with a lovely DIY project. Let’s start to make a lovely week. The project was found on Pretty Chic Blog. You can guess from the name that the stuffs would always be pretty and chic, so does our today DIY project.


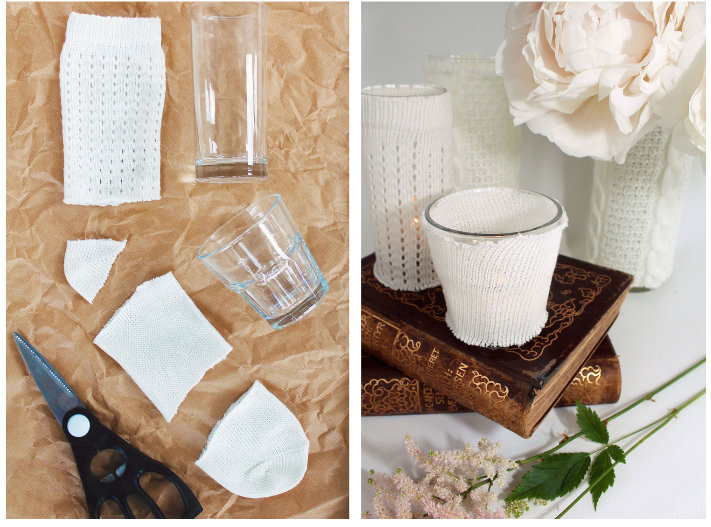
To make the project, there are some simple materials need to be prepared. They are mainly: scissors
knit socks, leg warmers, sleeves from old sweaters etc– whatever you have
jars or glass votives
sewing thread (optional)
flowers to put inside


Basically, use the scissor to chop up the socks or any other knitwear into the same lengths as the votives you’re using… and then slip them onto your votives. That’s it! You make it done! Last, you can put the flowers into it. Oh, last but not least, it is suggested that you titch around the edge to avoid fraying.


It is really easy and fun and smart!!! How about start now to make your own knit votive covers?


(Please note that the pictures are from Pretty Chic Blog)


Monday, May 21, 2012

Tuesday DIY: Perfect Sakura Print


Hi all, happy Tuesday! We got perfect Tuesday with sunshine and gentle breeze here. What a lovely spring day. How about your days? Follow me and let’s do a very lovely project on the day.

Today the project we are going to do is just easy and fun: DIY Perfect Sakura Print. When it comes to sakura, most people would think of the sakura scenery in Japan. Yes, definitely beautiful. If you got a chance to view it, never miss it. Just like the soft and beautiful sakura, there are many zakka items are also cute and soft.

When you are going to do this, you will need some basic materials: a plate to serve the pink paint, an empty Coca-Cola bottle, a piece of paper and a painting brush.

The first step, use the painting brush to draw some branches on the paper. It would be very easy, some lines will do. This will make a basic shape of the sakura tree. Next, put the bottle into the plate which already served the paint. This way, the paint can be invited to the bottom of the bottle. The third step, is use the bottom to paint on some of the branches. By a press of the bottle, the petal of the sakura will come out! Easy? Try it yourself then, and hope you can enjoy the process like me. Here are the some pictures for the steps.